
STRØM City M Assembly
Please follow the video or pdf guide in order to assemble your new city bike securely.
After assembly, you will have to watch our ready for the road guide for tightning the bolts, lubricate the chain and adjust gears, brakes, saddles and handlebar in to experience the best ride possible.


1 – Unboxing
Begin by taking the seat out.
Take the whole bike out. Note that the front wheel is loose, and is attached to the bike.
Take the remaining parts out. There should be a small box and a longer rectangular box.
2 – Check content
Content of the small box:
2 x pedals
1 x charger
3 x Allen hex keys
2 x wrenches
1 x Cable with 3 or 4 heads.
The big rectangular box contains the battery.
3 – The Handlebar
- Remove the protection gradually.
- Place the handlebar on the top of the headset.
- Take a screwdriver to remove the small plastic cap in the middle of the adjustable stem. Don´t throw it away!
- Take the 5mm Allen hex key and screw the handlebar into the headset, but not all the way yet.
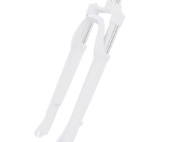
4 – The Fork
- Remove the protective foam.
- Remove the plastic piece at the bottom of the fork.
Simply stand on it and pull up the handlebar gently.
5 – The front wheel
- Take the fender of the wheel.
- Remove the big plastic piece protecting the brake disc.
- Unscrew the two bolts located at the center of the wheel.
- Insert the wheel into the fork. Be sure the disc brake will be aligned with the brake mechanism.
- Remove the protective foam for the bike stand and let the bike rest on it.
- Tighten the bolts back on the wheel and use the 15mm wrench.
- Align the loose handlebar with the wheel and tighten it all the way.
- Tighten the bolts for the stem on each side.
- Once that is done place the plastic cap from the handlebar back in.
6 – The Fender
- Remove the protective foam from the down tube and from the fender.
- Remove the little knot located between the front light and the wheel.
- Slide the fender in from the back and attach the knot back. Use the 10mm wrench and 5mm Allen hex key to tighten the fender properly.
- Attach the fender legs to the bottom of the fork.
7 – The Pedals
- Check the pedals to see which one is right and which is left.
- Remove the protective foam from the crank arms, located at the bottom of the bike.
- Screw in the pedals and use the 17mm wrench to help tighten it.
8 – Align the brakes
- Remove the protective foam from the handlebar.
- Use the 5mm Allen hex key to unscrew the bolts located at the brake mechanism. But only a bit.
- Now hold the brake handle in and tighten the bolts.
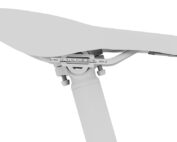
9 – Adjust the handlebar
To adjust the handlebar angle, slightly unscrew the four bolts and adjust the angle to your liking. Tighten them thereafter.
To adjust the angle of the stem, simply look below it. You will see a screw underneath. As well as two on the sides of the stem.
- Unscrew the bolt below, but not all the way out. Use the 4mm Allen hex key for this.
- Then slightly unscrew the two bolts on the sides and not all the way out.
- Now you should be able the adjust the stem up and down.
- Tighten the bolts back in again.
10 – The Saddle
- Undo the seat clamp and insert the seat.
- Adjust according to your waist.
- Close the seat clamp to hold the seat.
Note: If the seat is a bit loose, then the seat clamp needs to be tightened. There is a screw on the side of the clamp, where you can do this, and do that only when the seat clamp is open. Don´t tighten it too much, as you have to be able to close it.
11 – Replace the splitter cable
In the box, you might have received a cable with 3 or 4 extra heads.
This is the splitter cable, which you need to replace the other cable in the front of the bike since it is too short.
- Unscrew the cable heads and pull them gently apart from each other.
- Take the new cable and attach it accordingly to the colors. There are two red ones for the brakes and it doesn’t matter which one you insert them too.
- Screw the heads together.
12 – Final Adjustments
Check the fenders. They might touch the frame, which can create a rattling noise, due to the resonance from the motor.
Push in the fender a bit or get a hold of some thin rubber and place it between the frame and fenders.
Pump the tires with air.
It is also possible to adjust the bike stand if you want the bike to stand more upright or lean more over.
13 – Important notes!
Now that you have assembled your new STRØM bike here are some important tips you would need to follow.
1. Be sure that you have tightened the bolts correctly.
2. Make sure you have put on the strips correctly. If any wires are to loose, especially the motor cable, it could result in them getting cut by the wheel and in the worst case getting stuck. If the strips are not put on correctly, the warranty does not cover it.
3. Check if the motor reacts properly. Do this by tilting the bike on the bike stand and holding the “-” button down to activate the walk assist mode or use the speed throttle if you have a US version. Listen after rattling noises or see if something is out of line.
4. Check the Shimano derailleur if it is aligned correctly. It is very important since an uneven derailleur could potentially get stuck in the back wheel.
Use the search function below to search for further instructions, because we have a post for anything.
Welcome to the family and enjoy the ride!
STRØM CITY M Assembly & get ready
Here you will find information on assembly of your new STRØM CITY M, and how to get it ready for the road with tips and tricks to make your ride more convenient.
More helpfull STRØM guides
Suspension fork installation – City M
Suspension fork installation (STRØM City M) This video will show you how to safely install our suspension fork for STRØM city M The video guide will show you step-by-step and how to safely [...]

Handlebar adjustment
Handlebar adjustment Here is a guide on how to safely mount your stem and adjust the handlebar of your STRØM City bike. Step by step 1 - Pre [...]
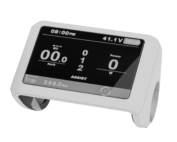
Display guide
STRØM City display guide Here is a PDF guide on how to control your new display for your STRØM Bike. Please click the pdf link below. PDF Guide PDF Guide [...]
Saddle & seat post adjustment
STRØM saddle & seat post Adjustment Here you'll find a guide to adjust the saddle and seat post of your STRØM e-bike. Step by step 1 - Saddle [...]

Hydraulic Disc Brake Adjustment
Hydraulic Disc Brake Adjustment On this page, you will learn how to adjust your Tektro Hydraulic Disc Brakes, on your STRØM City E-bike PDF Guide PDF Guide [...]
